Are you searching for a way to improve PC performance? But don’t want to spend money. So you have visited the right place.
RAM is one of the essential parts of a PC because that is where all instructions are running the CPU and other components. However, for some tasks, we need more memory, and we face problems such as slowdowns. To reduce these problems without having to buy more RAM.
This time we are going to learn how to increase Virtual Memory and make it optimal for Windows 10. So, without further ado, continue reading and get the most out of your computer.
Table of Contents
What Is Windows Virtual Memory?
Virtual memory is a technique used by operating systems to access a more significant amount of memory than physically available, resorting to alternative storage solutions when installed RAM is exhausted.
The processor can access it much faster than if it had to obtain it directly from the hard disk. RAM is much faster than any hard drive. SSD drives are indeed much faster than traditional mechanical drives, but even so, they are still a much slower storage medium than RAM.
How To Increase Virtual Memory On Windows 10?
It usually recommended that the amount of virtual memory should be 1.5 times higher than the amount of RAM that we have installed on the computer.
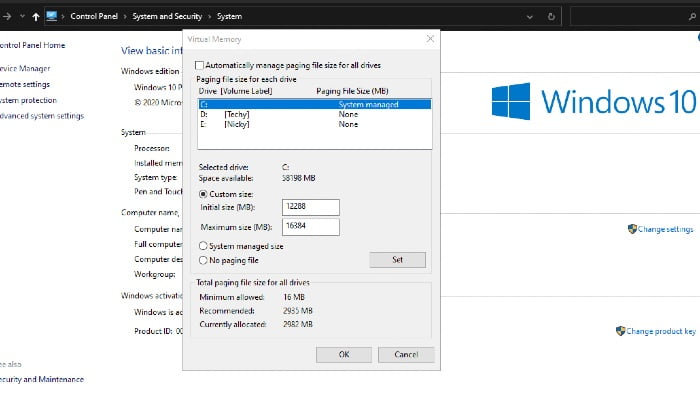
If we take a computer with 8GB of RAM as a reference, which is a reasonably typical configuration today, we should use a 12GB of virtual memory. We can use a slightly higher amount, for example, 16 GB to make sure it does not fall short.
Steps to increase Virtual Memory on Windows 10:
- Right-click on this PC and, click on “Properties“;
- On the left side of the window, click on “Advanced system settings“;
- On the “Advanced” tab, click on “Settings…” in the “Performance” box – the first button;
- Again on the “Advanced” tab, click on “Change…”;
- Uncheck the option “Automatically manage the paging file size of all units“;
- Select the drive that contains the paging file – usually the partition on which the system files is installed – and check the option “Custom size“;
- Define the “Initial size” and a “Maximum size” (both in MB) for the paging file and click on “Define“;

- An alert will inform you that it is necessary to restart Windows for the changes to take effect.
Conclusion
Once you have followed these steps correctly, you will have increased the virtual memory in Windows 10 on your computer.
If you have already managed to configure or increase virtual memory on Windows 10, leave us a comment and keep reading our blog. Until next time! Don’t forget to subscribe by clicking the left bottom bell!


